
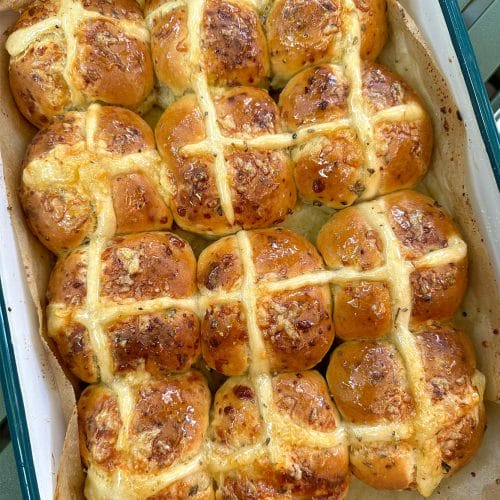
Hot cross buns with cheddar, jalapeño and honey
Servings: 18 buns
This is the time of year that I brace myself for the debate that invariably begins to bubble between HCB purists and those willing to throw caution (and tradition!) to the wind and try something new. As far as I’m concerned, my sentiments lie somewhere in Switzerland… Neutral! If Easter time means mixed spice and orange peel, I’m all for it, but if you’re ready to try something new, then here’s a savoury bun combo that’s perfect for breakfast, lunch and dinner! Even if you do make a more traditional bun, the thing to remember here is that Tangzhong, a gift from Aussie food blogger Lorraine Elliot (Not Quite Nigella), that I’ll never not use for bakes like these. A sharper cheddar works best here - it’s lovely against the sweetness of the honey and heat of the jalapenos. The ¼ cup jalapeno measurement will give you a gentle heat level, or you can double for more of a kick. If you can get your hands on the fresh ones, swap these in (less the seeds and membrane, of course) but I’ve just used the jarred jalapenos you buy from the shops.For a sweeter bun option that’s still a twist on a classic, try these sticky date HCB.
PRINT
Ingredients
Tangzhong
- 2 tbsp plain all-purpose flour
- 1 cup (250ml) milk
Hot cross bun dough
- 2 eggs at room temperature
- 4⅓ cups (650 g) plain flour, plus extra for kneading and rolling
- 1 tbsp dried yeast
- 1 ½ tsp salt flakes
- 2 tbsp honey
- 1 tsp dried oregano
- 100 g unsalted butter cubed and softened
- 200 g sharp strong cheddar cheese reserving 50g for topping
- ¼ cup finely chopped jalapeno
Honey glaze
- 3 tbsp honey
- Pinch of salt flakes
- ½ tsp dried oregano
Flour paste X’s
- 80 g plain flour
- 4 tbsp water
- ¼ tsp salt flakes
Instructions
- Start by making the Tangzhong. Add ½ cup (125 ml) water and the flour to a small saucepan. Stir vigorously with a wooden spoon over medium heat for 2 minutes; the mixture will start to thicken and become glossy at this point (65°C/150°F). Turn the heat off. Add the milk and whisk well, cooling the temperature down to 45°C (115°F).
- Next, make the bun dough, which you can do by hand (gladiator, I salute you!) or using a stand mixer. If you’re going with the second option, place the tangzhong, eggs and honey in the mixer bowl. Using the paddle attachment, mix for a minute or so, until blended. Switch over to the dough hook and add the flour, yeast, salt and oregano. Give them a whirl on low speed for 5 minutes, scraping down the sides of the bowl every now and then.
- When the dough has stopped clinging to the bowl, up the speed a little to medium–low and, with the motor running, start adding the butter, a few cubes at a time. Wait for it to assimilate before adding more. Continue to do this for about 10–15 minutes, scraping down the bowl every now and then, if need be, until the dough is lusciously soft and elastic and comes away from the side of the bowl with ease. If it is still sticking, add another tablespoon or two of flour — max! — and keep mixing until incorporated. Cover with plastic wrap and leave in a warm spot for 1-2 hours, or until doubled in size.
- If you don’t have a stand mixer, no biggie! Use a wooden spoon and some elbow grease to combine the tangzhong and eggs to a uniform custardy colour. Put the flour, sugar yeast, salt and spices in a large bowl, giving it a mix with your wooden spoon. Make a well in the centre and pour in the egg mixture, stirring until it comes together and is raggy and sticky. Turn out onto a floured bench and start kneading. The mixture will be sticky and a bit hard to handle, but persevere, and keep some flour handy to dust the bench now and then — but not too much, as this is a loose dough.
- Start adding the butter, one cube at a time, and knead into an elastic dough; this will take about 10 minutes. The process will be messy, but it does work. Once done, add the dough to a clean bowl. Cover with plastic wrap and leave in a warm spot for 2 hours, or until doubled in size.
- When your dough is ready pop onto a lightly floured surface and flatten into a rectangle shape. Sprinkle your cheese and jalapeno across the dough and then roll up into a log. Now knead to incorporate all the cheese and jalapeno through the dough. You may need to tear the dough to mix them through, just keep kneading and persevering for 5 minutes - it’ll come back together again.
- Line a large baking tray (or 2 smaller ones) with baking paper. Weigh your dough and divide by 18. You rolls should weigh approx. 75-80 gm per bun. Some scales and a dough cutter will come in handy here. Shape your weighed blobs into rounds and place onto the lined baking tray. Sit them quite close to each other so that when they rise and bake, they stick together. Rest until doubled in size again, which should take around 30 minutes. (At this point, if you’d rather bake them in the morning, cover them and pop into the fridge to slow the proof).
- Preheat your oven to 180℃ degrees (160℃ fan). While resting, make your flour paste by combining water, salt and flour into a slurry and stirring about until smooth. Transfer to a piping bag with a small nozzle or make your own with a sheet of baking paper.
- When the buns have rested and doubled, pipe the flour paste across each to form crosses. Bake the buns on the middle rack of the oven for 30–35 minutes, or until they’re golden brown, and a skewer comes out clean of dough.
- With 10 minutes to go on the timer, make your honey glaze. Combine all of the ingredients in a small saucepan, bring to a gentle boil then switch off.
- As soon as the buns come out of the oven, brush liberally with the glaze and then let them cool.
Notes
Tips
These are best eaten within the first 2–3 days but can be brought back to life by toasting for a little time in the oven with a splash of water (bread-wetting!) to reheat.
Store in an airtight container in a cool, dry place (ideally not the fridge, as that’ll cause them to dry out faster!). These can also be sliced in half and frozen, ready for toasting as and when they’re needed over the next few months.
